Are you tired of staring at your basement’s dull, uninspiring walls and wishing for a complete transformation? Look no further as we show you the easiest way to transform your basement walls with eight simple steps. In this blog post, we’ll share how to finish a basement wall without requiring you to be a professional handyman or a seasoned DIY expert.
With the right tools and patience, you can quickly turn your basement into a polished living area you and your family can enjoy. Imagine a comfortable and welcoming environment where you can spend time with your loved ones or entertain guests in style. This is possible with the simple steps we will share with you today.
We understand that tackling a basement renovation project can be overwhelming, especially if you are unfamiliar with the process. However, with our expert guidance, you can confidently turn your basement walls from drab to fab in just a few easy steps. So, are you ready to transform your space and add value to your home? Join us as we dive right into the details of how to finish a basement wall in 8 simple steps.
Gather Your Tools and Materials
To successfully finish a basement wall, gathering all the necessary tools and materials is important. Here’s a comprehensive list of what you’ll need:
- Drywall panels to cover the wall
- Joint compound for smoothing out joints and filling in cracks
- Drywall tape to reinforce joints
- Sandpaper for smoothing out rough areas
- Measuring tape for accurate measurements
- Utility knife for cutting drywall panels to size
- Screwdriver for attaching drywall panels and screws
- Screws to secure the drywall panels
- Stud finder to locate the studs in the wall for attaching drywall panels and screws
Now that you have all the necessary tools and materials, it’s time to finish your basement wall. Start by measuring the wall and cutting your drywall panels to size using a utility knife.
Next, attach the drywall panels to the studs in the wall using screws and a screwdriver. It’s important to ensure that the screws are flush with the surface of the drywall panels.
Once the drywall panels are attached, use a joint compound to smooth out rough areas and fill in cracks or gaps. Apply drywall tape over the joints to reinforce them and prevent cracking.
After the joint compound has dried, use sandpaper to smooth out any rough areas and ensure a smooth surface for painting or wallpapering.
By following these steps and using the necessary tools and materials, you can successfully finish your basement wall and create a finished and polished look for your space.
Identify Your Wall Type
When embarking on a basement finishing project, it is crucial to identify the type of wall you’re working with. Knowing your wall type not only helps you determine the best course of action but also enables you to address any underlying issues that may affect the outcome.
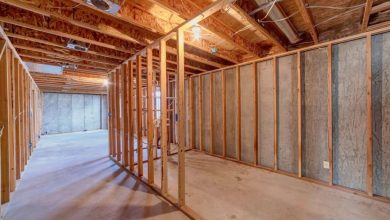
Typically, basement walls are constructed using concrete or cinder blocks. These materials are incredibly sturdy and durable, but they pose a unique challenge to those who want to finish their walls properly. If your basement walls fall into this category, you must attach furring strips to the wall studs using concrete screws.
Furring strips are a base for attaching drywall or other finishing materials to your concrete or cinder block walls. They also provide crucial insulation, keeping your basement warm and dry. You’ll need to locate the wall studs to attach these strips, typically hidden behind the concrete or block material.
Once you’ve located the wall studs, use a power drill with a masonry bit to drill pilot holes into the concrete or block. Insert the concrete screws into the pilot holes and use a hammer drill to secure them tightly. Then, attach the furring strips to the screws using a power drill, making sure they’re evenly spaced and level.
However, if your basement walls are made of drywall, you can skip this step. Drywall is a common material used for interior walls in many homes, so this type of finishing project may be less complicated than those involving concrete or cinder block walls.
Regardless of your wall type, taking the time to identify it before you begin your basement finishing project can save you time, money, and headaches in the long run. With the right tools and techniques, you can transform your unfinished basement into a beautiful, functional space that you and your family can enjoy for years.
Install the Furring Strips
The first step in finishing your basement walls made of concrete is to install furring strips. This process can seem daunting, but you can do the job quickly and efficiently with simple steps.
Start by measuring the distance between the floor and ceiling to determine the length of the furring strips needed. Cut the strips accordingly, using a saw or other cutting tool.
Next, use a stud finder to locate the wall studs. This is important, as it ensures that the furring strips are attached securely to the wall. Once you’ve located the studs, attach the furring strips using concrete screws. Be sure to use screws that are long enough to fasten the furring strips to the wall securely.
When attaching the furring strips, ensure they are level and evenly spaced, about 16 inches apart. This will ensure that the drywall panels are correctly supported and will create a smooth and even surface when finished.
Overall, installing furring strips is an essential step in finishing a basement wall made of concrete. With the right tools and techniques, it can be completed quickly and easily, providing a strong and stable foundation for your finished basement walls.
Cut and Install Drywall Panels
After installing the furring strips, you should cut and install the drywall panels to finish the basement wall. First, measure the height and width of the wall and use a utility knife to cut the panels to the correct size. Then, attach the panels to the furring strips using screws. It’s essential to leave a gap of about 1/4 inch between panels for expansion. This gap will allow for any movement or shifting of the wall without causing damage to the drywall.
When cutting the drywall panels, it’s essential to use a sharp utility knife and to make multiple passes to avoid tearing the paper on the drywall. To attach the panels to the furring strips, use screws that are appropriate for the thickness of the drywall and the furring strips. Be sure to follow the manufacturer’s instructions for screw spacing and placement.
Once the drywall panels are installed, it’s time to tape and finish the joints. This will involve filling gaps or seams with joint compounds, applying drywall tape to cover the seams, and then applying additional compound layers to smooth and blend the surface. After the joint compound has dried, the surface can be sanded, painted, or finished with texture.
Overall, finishing a basement wall requires careful planning and attention to detail. By following the proper steps, it’s possible to create a smooth and professional-looking surface that will enhance the overall appearance of the basement space.
Apply Drywall Tape
You must apply drywall tape correctly to achieve a professional-looking finish for your basement wall. After installing the drywall panels, you should begin this crucial step in the finishing process.
Begin by applying a layer of a joint compound onto the surface. This helps the tape adhere better and makes for a more robust finish. Next, place the drywall tape onto the joint compound and press it firmly in place. Use a drywall knife to smooth out any bubbles or wrinkles that may appear.
Once the tape is in place, apply a second layer of joint compound. This time, feather it outward to blend seamlessly with the wall. Keep the compound thin and smooth, adding more layers as necessary until you achieve the desired level of finish.
It’s important to note that drywall tape is critical to ensuring a smooth and professional finish for your basement wall. Improper application may lead to cracks, gaps, and other unsightly imperfections. Take time with this step, and ensure you apply the tape correctly. The result will be a great wall ready for painting or wallpapering.
Sand and Repeat
To finish a basement wall, one must first allow the joint compound to dry for at least 24 hours. Once dry, the wall should be sanded down until smooth and even. This process should be repeated twice, allowing each layer to dry completely before sanding it down and applying the next layer.
Make sure to use an appropriate sandpaper grit for each layer. It usually starts with a coarse grit, such as 100 or 120, and progresses to a finer grit, such as 220 or 320, for the final layer. This will ensure a smooth finish on the wall.
After the final layer is applied and sanded down, examine the wall for any imperfections or unevenness that may remain. Touch up any areas that need it, and once again, sand down until smooth.
It is important to note that proper ventilation is necessary when applying joint compound and sanding. One should wear protective gear such as a mask and goggles and ensure the room is well-ventilated to avoid inhaling dust and fumes.
In summary, follow the sand and repeat the process for a perfectly finished basement wall, allowing each layer to dry, sanding it down, and repeating it twice. By doing this, the wall will have a smooth and even finish.
Prime and Paint
To finish a basement wall, applying a coat of joint compound is important to ensure it is sanded down to a smooth finish. Once this is done, the next step is to prime and paint your wall to give it a polished look. To begin, select a primer compatible with your chosen paint color. It would help if you chose a high-quality primer as it will help fill in any tiny cracks or imperfections in your wall, ensuring a smooth, uniform finish.
Before applying the primer, thoroughly clean the wall to remove dust or debris. You can use a damp cloth or a vacuum cleaner with a soft brush attachment. Once the wall is completely dry, apply the primer in a thin, even coat with a brush or roller. Allow the primer to dry completely according to the manufacturer’s instructions; this usually takes at least 24 hours.
After the primer has dried, it’s time to apply your chosen paint color. You can experiment with different finishes, such as satin or semi-gloss, to achieve your desired look. Using paint suitable for painting basements as lower-grade paint may not adhere properly to the concrete walls. In addition, using waterproof paint is recommended in areas that may be exposed to moisture.
Start by cutting in the corners and edges of your wall using a brush. Then, using a roller, apply the paint in long, even strokes. Remember to work in small sections to ensure that the paint does not dry too quickly, which can result in an uneven finish. Allow the paint to dry completely between coats, usually around 24 hours.
The final step in finishing a basement wall is to prime and paint it. Proper preparation and careful application of primer and paint will help to achieve a polished, professional look for your basement. Remember to choose a paint specifically designed for basement areas and experiment with different finishes to achieve the desired effect.
Finish with Baseboards
Adding baseboards is essential for a polished look when finishing a basement wall. To begin, measure the length of the wall and cut the baseboards to size using a saw. Then, attach the baseboards to the wall using a nail gun or finishing nails. This will create a seamless transition from the wall to the floor.
Add shoe molding to cover any gaps between the baseboards and the floor. This will also provide a finished look and prevent dirt or debris from getting caught in the gap. Ensure the shoe molding is cut to fit and securely attached to the baseboards.
By following these steps, you can give your basement wall a professional and polished finish. Incorporating baseboards and shoe molding is a straightforward and effective way to enhance the overall appearance of your basement.
Conclusion
In conclusion, finishing a basement wall is an exciting DIY project that can add value to your home and create a comfortable living space. With these eight easy steps, you can quickly transform your basement into a cozy area where you and your family can enjoy quality time together. It’s important to remember that while the process may seem daunting, you can tackle this project like a pro with the right tools and materials.
Whether you’re looking to create a home theater or add an extra bedroom, finishing your basement wall is a great way to add more livable space. By following these simple steps, you can feel confident completing the project quickly. With patience and hard work, you’ll be able to enjoy your newly transformed space in no time.
So, what are you waiting for? With the how-to guide for finishing a basement wall, you have everything you need to start your DIY project. With time and effort, you can create an inviting and cozy living space that you and your family will love. Congratulations on taking the first step toward improving your home!