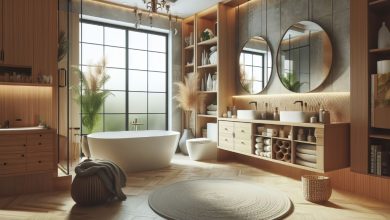
Bathroom cabinets provide an attractive and functional way to organize and store bathroom items. But sometimes, the cabinets start to look a little worn out or dated. Painting them is an excellent way to give them a new look, but it can be a bit daunting if you’ve never done it before. In this blog post, we’ll provide step-by-step instructions on how to go about repainting your bathroom cabinets.
Firstly, you’ll need to make sure that you have the right supplies for the job. You’ll need to buy quality paint and a primer for the task. You’ll also need sandpaper, painter’s tape, and a brush or roller for applying the primer and paint. Once you have all of these supplies in hand, you can begin prepping the cabinets.
Start by cleaning the cabinets thoroughly before sanding them lightly. This will help create a smooth surface that allows the primer and paint to have better adhesion. Once the cabinets have been sanded, apply painter’s tape around the edges where you don’t want the paint to get onto walls or other surfaces. Now you can start applying primer and then the final coat of paint! Make sure you apply multiple thin coats so that it looks smooth and even. Once the final coat has dried, remove the painter’s tape and admire your new look!
Preparing Your Bathroom Cabinets for a New Paint Job
Preparing your bathroom cabinets for a new paint job is an important step in ensuring a high-quality, professional finish. Taking the time and effort to thoroughly clean and prepare the cabinets will pay off in the end and will provide a beautiful, long-lasting result. Here are some tips for prepping your bathroom cabinets:
- Remove all items from the cabinet. This includes any hardware and knobs, containers, and any items stored inside the cabinet. Take care when removing items so that you don’t damage any of the hardware or scratch the surface of the wood.
- Clean the surfaces of the cabinets with soap and water, and then dry them off with a soft cloth. Make sure to remove any dirt, dust, or grease that may have accumulated on the cabinets.
- Sand down any rough patches or spots that need to be smoothed out before painting. Be sure to use good quality sandpaper and sand in one direction only.
- After sanding, remove any remaining dust with a damp cloth or vacuum cleaner.
- Use painter’s tape to cover any areas around the cabinet that you don’t want to be painted, such as door frames or the floor.
- Apply primer to the cabinet surfaces to ensure even coverage of the paint color. Allow the primer to dry completely before beginning to paint.
- Finally, apply two coats of paint, allowing each coat to dry completely before applying the next coat.
Following these steps for prepping your bathroom cabinets for a new paint job will ensure that you have beautiful, long-lasting results for years to come.
Selecting the Right Paint for Your Bathroom Cabinets
When it comes to renovating your bathroom, the most important step is to select the right paint for your cabinets. Painting your bathroom cabinets can be a daunting task, but with a little research, you will be able to choose the perfect color and finish that meets your needs.
The first thing to consider when selecting paint for your bathroom cabinets is the type of surface material you have. Common cabinet surfaces include wood, metal, and plastic. Each of these materials requires a different type of paint. For instance, metal cabinets may require special oil-based paint due to their tendency to corrode. Plastic cabinets may require a different finish such as glossy or matte, depending on the desired look.
The next step is to choose a color that matches your vision. Remember that colors appear differently in natural lighting versus artificial lighting and vice versa. This means that you may want to sample colors at different times of the day and night in order to get a proper view of how it looks overall. Here are some tips for selecting colors: pick lighter colors for small bathrooms, warm colors for larger bathrooms, and limit bold colors to accents or accessories.
Once you have chosen your color, you’ll need to decide on the finish. Glossy finishes create an attractive shine but are difficult to clean and can show scratches easily; they are best used on plastic cabinets or countertops. Satin finishes provide a muted sheen while hiding scratches and fingerprints better; it is recommended for use on wood cabinets. Matte finishes provide little-to-no shine and are usually used on walls; they are easier to clean and do not reflect light well but may be used on wood cabinets if desired.
Finally, make sure you use high-quality paint supplies. Investing in better-quality brushes, rollers, and primers will ensure that your cabinets don’t chip or peel over time. Consider also using exterior grade paint for added durability on wooden cabinets if they are exposed to moisture frequently.
With a bit of research and preparation, you can be sure that the paint you select will maintain its color and look throughout time while accentuating the beauty of your bathroom cabinet renovation project.
Tips for Applying a Professional Paint Finish on Your Cabinets
Painting your cabinets can be a great DIY project if you have the right tools and supplies. Here are some tips to help ensure a professional paint finish on your cabinets:
- Start with clean, oil-free surfaces. Prep your cabinets by removing any dirt, dust, and grease build-up before beginning the painting process. Use a degreasing cleaner to clean all surfaces before starting.
- Sand lightly and use a high-quality primer. Sand down any nicks and scratches using fine-grit sandpaper. Allow the surface to dry thoroughly before applying a high-quality primer to help protect your cabinets from moisture and rusting.
- Use a paint sprayer or roller to apply the paint evenly. If you’re painting your cabinets with a brush, be sure to apply them evenly and in one direction only to make sure you achieve a smooth finish. If you’re using a paint sprayer or roller, allow the coats to fully dry before adding the next layer of paint.
- Allow time for the cabinets to dry properly. Paint should be allowed to dry for at least 48 hours before replacing hardware, as well as touching up any areas that need additional work.
- Finish off with a few layers of sealant for added protection. A few layers of sealant can help protect your painted cabinets from scratches, chips, and other damage from daily use or wear and tear over time.
Choosing a Color Palette for Your New Cabinet Paint Job
Choosing a color palette for your new cabinet paint job can be quite overwhelming. With so many colors to choose from it can be difficult to narrow it down to just a few. However, by doing some research and taking some time to think about the look and feel you want for your kitchen or bathroom, you will be able to come up with a beautiful color palette that best suits the space.
The first step in choosing a color palette is to consider the existing colors in the room. Look at the furniture, countertops, and other surfaces to gain an understanding of what colors are already present in the space. From there you can begin to get an idea of what colors will work best in the space.
Next, consider what type of look and feel you are trying to create. Are you going for a modern and vibrant look or something more natural and earthy? Once you have an idea of the feel you are looking for, you can begin narrowing down your choices.
Think about the type of shades you would like as well. If you’re looking to create a brighter look, consider using shades of yellow, pink, and blue. For an earthy and natural feel, think about working with shades of brown, green, and grey. You can also decide whether or not you want to incorporate multiple shades of the same color or use two accent colors to add additional visual interest.
When choosing your color palette, make sure it blends in well with the existing décor and that all of the colors complement each other. Additionally, consider how much light will enter the space during different times of day as this can affect how your colors appear once painted on the cabinets. Taking all these factors into consideration will help you come up with a beautiful color combination that best suits your new cabinet paint job.
How to Make Sure Your Paint Job Stays Looking Fresh
Paint jobs can give life to your home, making it look brand new again. However, while they look great when they first go on, over time they can start to look dull and dingy. To make sure your paint job stays looking fresh and new, here are some tips you can use:
- Clean the walls regularly: Dirt and dust can settle over time, making your paint job look dull. Make sure you clean your walls at least once a month, using a damp cloth to remove any debris.
- Use the right paint: Choosing high-quality paint that is designed for the environment will help keep your walls looking great for longer. Make sure you do research and get professional advice when selecting the best option for your home.
- Get the surfaces properly prepared: Do not skimp on preparation work before you begin painting. Walls should be washed, sanded, and primed to ensure the paint adheres properly and lasts longer.
- Apply multiple coats: Applying several thin coats of paint, rather than one thick coat, will help create a smoother and more even finish that will last longer.
- Don’t forget the sealant: Protective sealants will help keep paint from chipping, fading, or peeling with time. Whether you choose an acrylic or latex sealant, make sure you apply it once your paint job is complete.
By following these simple steps, you can guarantee that your paint job will remain to look fresh for years to come.
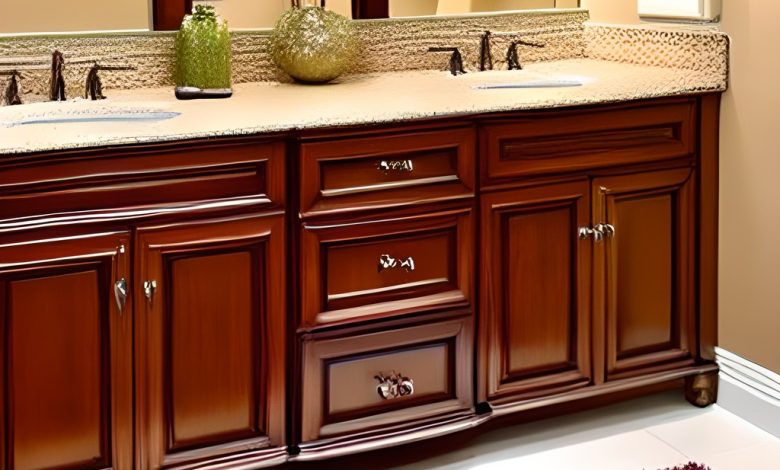
Step-by-Step Guide to Repainting Bathroom Cabinets
Painting bathroom cabinets is a great way to update the look of any bathroom. With the right materials and techniques, you can transform tired, old cabinets into beautiful, modern cabinets. This step-by-step guide will help you get the job done quickly and efficiently.
- Prepare the Cabinets: Start by removing all doors, hardware, and shelves. Thoroughly clean the surfaces to remove any dirt, grease, or residue. Pay special attention to corners, edges, and other small details.
- Sand the Surface: Use 120-grit sandpaper to sand down all surfaces. This will help create a smooth surface for painting and ensure a good finish.
- Apply Primer: Use a high-quality primer specifically designed for the surfaces you’re painting. Follow the manufacturer’s instructions regarding application and drying times.
- Apply Paint: Use a paintbrush or roller to apply two coats of paint, allowing each coat to dry before applying the next. Make sure to cover all surfaces evenly for a professional finish.
- Reattach Hardware: Once the paint is completely dry, reattach all doors and hardware.
- Enjoy Your Handiwork: Stand back and admire your work! You can now enjoy your newly painted bathroom cabinets for years to come.
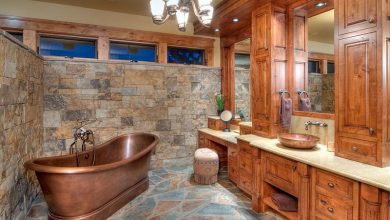
Creative Ways to Update Your Bathroom Cabinets with Paint
Painting your bathroom cabinets is a great way to bring life back into your old and outdated bathroom cabinets. By using special techniques, such as layering or dry brushing, you can create visually intriguing and unique designs. Here are a few creative ways to update your bathroom cabinets with paint:
- Layer on the Color: Create interest in your cabinet by layering multiple colors. Start with a base coat of one color, then add accents of others. Try different color combinations and play with the intensity of the different hues for interesting effects.
- Faux Finishes: Create a classic look in your bathroom cabinets with a classic faux finish technique. Use a glaze and sealant combination to give depth and dimension to your cabinets. You can also add stencils for a more detailed look.
- Dry Brush Technique: Achieve a rustic, distressed look by using the dry brushing technique. Using various shades of paint, gently brush it onto your cabinets without adding too much moisture. This technique can be used to create an array of beautiful results.
- Metallic Accents: Add metallic accents to give your bathroom cabinets a touch of glamor. Use metallic paints or foils as well as metal hardware such as pulls and knobs to bring out the shine in your aged cabinets.
- Textured Paint: For a unique finish, try textured paint on your cabinets. Choose paint with texture to add texture and dimension without affecting the color of the cabinet itself. This technique works great for those who enjoy having an extra bit of dimension in their painted cabinets.
Updating your old bathroom cabinets can be an easy and creative way to bring new life into your bathroom design. From layering multiple colors to utilizing textured paints and metal accents, there are many creative ways to update your cabinets with paint that are affordable and fun to do!
The Pros and Cons of DIY Cabinet Painting
DIY cabinet painting is a great way to save money and make a room look refreshed without spending too much. However, there are both pros and cons that come with taking on this project yourself.
The Pros:
- Cost – DIY cabinet painting is significantly less expensive than hiring a professional. You can save hundreds of dollars by taking on the project yourself and buying the supplies needed.
- Work at Your Own Pace – When you do the job yourself, you are in control of when you start and finish the project. This can be beneficial for people with a busy schedule, as you can work on it in your free time.
- Make Your Cabinets Your Own – DIY cabinet painting allows you to customize your cabinets to the way you want them. You can pick out any color, finish, or design that you want for your cabinets and make them unique to your home.
The Cons:
- Time – DIY cabinet painting can be a time-consuming project, so make sure you have enough time to dedicate to it before starting. The entire process from start to finish could take weeks or even months depending on the size of the job.
- Risk of Damage – Another potential disadvantage of DIY cabinet painting is that if it is not done properly, it could cause permanent damage to your cabinets or even the walls in your home. It’s important to take the time to research and read up on the proper techniques before tackling this project yourself.
- Less Professional Look – The results of DIY cabinet painting may not be as professional looking as that of a professional painter’s work. If you want a flawless, perfect finish, you may be better off hiring a professional instead.
Aftercare and Maintenance Tips for Bathroom Cabinets Post-Paint Job
After a DIY paint job, the right tips can help ensure that your bathroom cabinets remain looking great for years to come. Here are some aftercare and maintenance tips to consider:
- Clean Regularly: Use a mild detergent and a damp cloth to wipe down your cabinets. Avoid using abrasive cleaners and sponges, as they could damage the finish. Clean regularly to prevent dirt and residue from building up.
- Polish: If you want to add a little extra shine to your cabinets, use a furniture polish on a soft rag. Test this in an inconspicuous spot first, as some polishes can cause staining.
- Inspect: It’s important to inspect your painted cabinets periodically. Look for signs of cracking, chipping, or fading—and act promptly if you notice any of these issues.
- Touch Up: In some cases, you may need to touch up minor chips or scratches. Choose paint that matches your existing color, and lightly sand the area before applying the paint. Be sure to apply multiple coats if necessary.
- Organize: Categorizing and organizing items in your bathroom can help keep your cabinets looking neat and tidy. Make use of organizers or containers for items that don’t need to be out in the open.
With these tips, you can make sure that your painted bathroom cabinets look beautiful for many years!
Conclusion
Repainting bathroom cabinets is a great way to give your bathroom a fresh, new look. With some basic materials and a little bit of elbow grease, you can easily transform the look of your bathroom cabinets in just a few hours. Here’s how to get started:
First, remove all drawers and shelves from the cabinet and clean the surfaces thoroughly with a mild cleaner. Then, use sandpaper to roughen up the current finish so the primer and paint will adhere better. Apply primer and allow it to dry completely before applying your chosen coating. Finally, once the paint has dried, rehang the shelves and drawers for an updated look.
When repainting bathroom cabinets, make sure to practice safety by wearing protective glasses and a face mask when sanding or working with chemicals. Take care to prep the surface properly before beginning any painting project, as this will ensure that your new coat of paint looks beautiful and lasts for years. With the right materials and a little bit of effort, you can easily update your bathroom cabinets in no time at all.