Painting a bathroom counter can be a great way to freshen up a space on a budget. It’s an easy project that anyone can do with a few items from the hardware store and a bit of patience. In just a few simple steps you’ll be able to give your countertop a fresh look for years to come.
The first step is to prepare the area by cleaning off any dirt and debris and then sanding the surface with fine-grit sandpaper. This will help the paint adhere to the surface better and also give it an even finish when you apply the paint. Once you have finished sanding, use an all-purpose cleaner and dishcloth to wipe away any residue.
The next step is to apply two coats of primer. Primer acts as a basecoat, providing a consistent surface for the paint to stick to without having to use multiple layers. Once you have applied the primer, let it dry overnight before moving on to the actual painting process. Use high-quality latex paint in your desired color and apply two coats with a brush or roller, making sure to let each coat dry completely before adding the next for optimum coverage. Finally, add a sealant or protective layer to help keep your newly painted surface from fading or chipping over time.
Transform your dated bathroom counter with a splash of color and creative decorative accents! Whether you have recently painted your counter or have been considering doing this project, discover some creative ways to decorate it and add a personal touch to the bathroom.
Step-By-Step Guide to Painting a Bathroom Counter
Painting your bathroom countertop can instantly update and refresh the look of your space, but it is a project that requires patience and precision to get a polished result. With these easy step-by-step instructions, you’ll be able to completely transform the look of your vanity in no time.
- Prepare Your Space: Before starting any paint project, you need to make sure that your space is ready. Clear out any items from the countertop and clean the surface with a damp cloth to remove any dirt and residue.
- Sand the Surface: Lightly sand your countertop with 220-grit sandpaper to create a smooth finish. Wipe away any dust created by sanding with a dry cloth.
- Apply Primer: A coat of primer will help seal in any cracks or imperfections on the countertop and allow the paint to stick better. Use a brush or roller to apply an even layer of primer over the entire counter surface. Let dry completely before proceeding.
- Paint the Countertop: Paint your countertop with acrylic or epoxy paint, using either a brush or roller depending on the size of your counter. Apply two even coats of paint, waiting for each one to fully dry before starting the next coat.
- Seal Countertop: Sealing your painted countertop will help protect against scratches and water damage. Use a sealant made specifically for bathroom countertops and carefully follow all application instructions.
- Enjoy Your New Look: Once your paint and sealant have fully dried, enjoy your refreshed countertop! With these easy steps, you’ll have an updated bathroom vanity in no time.
What Tools and Supplies do You Need for Painting a Bathroom Counter
Painting a bathroom countertop can add a new look to your home. While it can be a DIY project, it requires some tools and supplies to make sure the job is done correctly. Here are the essential tools and supplies you need for painting a bathroom countertop:
- Paint: The most important part of the project is choosing the right paint for your countertop. Make sure to select a paint that is designed to adhere to laminate surfaces, as well as one that is water-resistant or even waterproof.
- Primer: Before applying the paint, you will need to apply a primer. This will help ensure that the paint adheres properly to the surface of the countertop and prevents chipping.
- Sandpaper: You will also need sandpaper to ensure that the surface of the countertop is smooth before you apply paint. The sandpaper will help give your countertop an even and professional look.
- Brushes: You’ll need brushes of various sizes for the crevices and corners of the countertop. Make sure to select quality brushes that are specifically designed for painting.
- Tape: To protect surrounding surfaces from your painting project, use painter’s tape to mask off sinks, walls, and other surfaces that don’t need to be painted.
- Drop cloths: Drop cloths are essential for painting a countertop. They will protect your floors from spills and splatters while you’re painting.
- Cleaners: Once you’re finished painting, you’ll need to clean up any spills or drips with cleaners such as rubbing alcohol or soap and water. Make sure to clean up all surfaces before you use them again.
These are the essential tools and supplies you need for painting a bathroom countertop. With these items in hand, you can get started on your DIY project!
Pros and Cons of Painting a Bathroom Counter versus Replacing It
Painting your bathroom counter can be a great way of transforming the look of the room without breaking the bank. However, before making the decision to paint or replace it, it’s important to consider both the pros and cons.
Pros:
- Painting a bathroom counter is typically a much less expensive option than replacing it.
- Many types of counters can be easily painted with paint specifically designed for bathrooms, such as epoxy paint.
- Painting allows you to customize the color and finish of your counter to match your exact preferences.
- Painting is a quick process that won’t disrupt your daily routine too much.
Cons:
- The paint may not last as long as a new counter and may have to be reapplied further down the line.
- The surface preparation required before painting can be quite time-consuming.
- It is more difficult to guarantee a truly seamless finish when painting than when replacing the counter.
- Specialty paints may be more expensive than standard paint options.
Ultimately, whether you decide to paint or replace your bathroom counter depends on your budget and needs. Consider all aspects of both options before making your decision to get the best outcome for your space.
Tips for Choosing the Right Paint for Your Bathroom Counter
Picking the right paint for your bathroom counter can have a big impact on your overall look and feel. Here are some helpful tips for choosing the right paint for your bathroom counter:
- Consider the Material: When selecting paint for bathroom counters, make sure to choose a product that can withstand moisture, such as latex or oil-based paints. It’s also important to make sure the paint you choose is meant for use on kitchen and bathroom countertops specifically.
- Look at Finish Options: Once you’ve figured out what type of paint is appropriate for your bathroom counter, it’s time to consider finish. Satin, semi-gloss, and high-gloss finishes offer different levels of shine and durability, so take the time to research different options and pick one that works best in your space.
- Focus on Color: When selecting a color, keep in mind that light colors work best in small bathrooms, as they can help keep the room feeling open and airy. Darker colors can add drama to larger bathrooms or those with plenty of natural light.
- Choose Low-VOC Paint: Volatile organic compounds (VOCs) are found in most paints, and they can emit noxious fumes and irritants into the air that could potentially aggravate allergies or other health conditions. To reduce exposure to VOCs, be sure to purchase low-VOC paint for your bathroom counter.
- Consider Clean-Up Time: Don’t forget about clean-up time when picking paint for your bathroom counter; some paints may require multiple coats and long dry times between coats, while others may be scrubbable or need minimal touch-ups over time. Knowing how much maintenance you’re willing to invest will help you choose the right paint for your project.
How to Prepare Your Bathroom Counter for Painting
- Before undertaking any painting project in your bathroom, it is important to prepare the area first. This includes readying the bathroom counter for painting.
- Start by cleaning the counter thoroughly with a strong cleaner such as a soap and water solution or other general-purpose cleaners. Scrub lightly with a sponge or cloth to remove any dirt and grime.
- Once the countertop has been cleaned, use sandpaper to smooth out any imperfections and rough patches on the surface of the countertop. This will allow for better adhesion of the paint when it is applied.
- Apply a coat of primer to the countertop using a brush, roller, or sprayer. The primer will help the paint adhere better, so make sure to cover all areas that will be painted. Allow the primer to dry completely before continuing with your painting project.
- Once the primer is dry, use painter’s tape to protect any areas that will stay unpainted, such as trim and moldings. This will help ensure that you stay within the lines when you apply the paint.
- Choose a quality paint designed specifically for use on bathroom surfaces, such as tile or ceramic sinks and counters. This ensures that the paint will be able to withstand water and humidity in the bathroom environment without peeling or chipping.
- Begin painting your countertop using a brush, roller, or sprayer following the instructions on your paint can for best results. Make sure to let each subsequent coat dry completely before applying another coat of paint over it.
- Once you have finished applying paint, carefully remove all painter’s tape from around any areas that should remain unpainted. Allow the countertop to dry completely before using it or replacing any items that were temporarily removed during painting preparation.
How to Apply Primer to a Bathroom Counter Before Painting it
Applying primer to a bathroom counter before painting it is an important step in creating a beautiful, long-lasting finish. Primer acts as a bonding agent between the topcoat paint and the surface you are working on, creating a strong bond that helps the paint adhere properly. Follow the steps below to properly apply primer to your bathroom counter before painting.
- Prepare the surface you are going to paint by wiping down with a damp cloth and then using a cleaner and degreaser to remove any dirt or grease from the surface. Once dry, sand it lightly with very fine-grit sandpaper to ensure proper adhesion for the primer.
- Use painter’s tape to mask off the edges or any areas you don’t want to paint and then lay down a drop cloth or plastic sheeting around the area to protect surrounding surfaces from getting a primer on them.
- Shake your can of primer well before opening and use a high-quality brush or roller to apply a thin, even layer over the entire surface of the bathroom counter.
- Allow the primer to dry completely before moving on to painting the surface. Depending on your particular primer, it may take several hours or overnight for a full cure.
- Once completely dry, lightly sand the surface again with very fine-grit sandpaper and then vacuum up any dust created. Your bathroom counter is now ready for painting!
Cleaning and Care Tips for Your Newly Painted Bathroom Counter
Cleaning and caring for your newly painted bathroom countertops is essential to ensure they look good and last a long time. Here are some tips to help you keep them looking pristine:
- Clean often: Wipe down the countertops with a microfiber cloth and mild soap regularly. Use caution when cleaning as harsh chemicals may damage the paint.
- Avoid abrasives: Abrasives such as scouring pads and steel wool should be avoided as they can scratch the paint and cause it to dull or chip.
- Protect from heat: Don’t place hot items directly on the countertops and always use decorative trivets or mats to protect from heat.
- Apply a sealant: Applying a coat of wax or sealant will help protect the painted surface from dirt and water. Be sure to use a product that is specifically formulated for painted surfaces.
- Use cutting boards or trays for food prep: This will help protect the paint from scratches and spills that can occur when vegetables and other food are being prepared on the countertop surface.
By following these tips, you can ensure that your newly painted bathroom countertops look beautiful for years to come!
Creative Ideas for Decorating a Painted Bathroom Counter
Decorating a bathroom counter starts with a clean, painted surface. It doesn’t need to be boring – plenty of creative ideas can add interest, color, and texture. Here are some tips and ideas to get you started:
- Choose a Color Scheme: Pick a primary color and accent colors that work together to create the look you want. Think of colors that will complement the paint on the walls, your bathroom fixtures and hardware, and other accessories in the room. Once you have chosen the colors, consider buying towels or bath mats in these colors to coordinate the theme of your bathroom space.
- Add Some Artwork: Hang art along one bathroom wall for a unique touch. Consider prints with a nature or beach theme to create a spa-like space. For something more modern, opt for abstract art or wall decals.
- Utilize the Wall Space: Hang shelves on one wall to store items like soaps and lotions. If you don’t have enough wall space, look for functional shelving that can be added to the counter.
- Utilize Under Counter Storage: Place baskets underneath the counter to store items like extra toilet paper or beauty products. Alternatively, install drawers so items can be kept out of sight while being easily accessible.
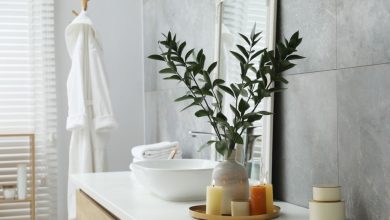
- Incorporate Plants: Greenery helps to freshen up any room and brings life to an otherwise sterile bathroom setting. Place a small potted plant on top of the counter for color and texture, or hang ivy from the wall for an added natural element.
- Install an Accent Lighting Fixture: Add visual interest to your bathroom with an eye-catching accent light placed above the countertop. This will add ambiance to your space and an extra layer of illumination, which is essential for doing daily tasks at the counter.
Conclusion
Painting a bathroom countertop is a great way to give it a whole new look, and it is an easy project that can be completed in just a few hours. You can transform your bathroom counter into a beautiful, updated space with the right supplies and preparation.
Before you start painting, preparing the counter’s surface and cleaning it thoroughly is essential. Sanding down any rough areas, filling in any chips and holes, and removing any existing paint are all essential steps to ensure your new paint job looks its best.
Once your countertop is prepped and ready to go, you can apply the paint. Choose a paint specifically designed for countertops, such as an oil-based enamel or epoxy-based paint. Start by applying a primer, then two coats of the chosen paint. Allow each coat to dry before adding the next for the best results. Finally, apply a sealer for durability and protection. With just a little effort, you can give your bathroom countertop a new look with a fresh coat of paint.